Dynamic Content Presentation with Button Toggling
By Gary Dan Burkhead
During my time as an English major in a web design program, one of the things I learned to be interested in is how one can use the internet to tell a story. The obvious choice is to simply put a story on the internet - on a blog or personal webpage. But, shockingly, not everyone gets excited at the prospect of reading huge blocks of type on their monitors. By modern web standards, this is boring - there's no interactivity, no sense of control in the experience, and after a while one starts to feel as if they're reading a lightbulb. It can, literally, be kind of a headache
Sometimes you have to spice it up a bit to draw in and maintain interest. And one of the ways we can do this is with JQuery's content toggling - hiding almost everything on the page at first glance and letting the user decide how they want to move through it.
If you've ever read a "Choose Your Own Adventure" book, you know the general idea. You get a story up to a point, then a choice of deviations from that starting point. The story changes and unfolds differently depending on your choice, and with each decision, new choices become available as old ones are taken away. The story has several possible endings and outcomes depending on how you pick your way through it - it can stretch on through several dozen pages or be over in a few paragraphs, all according to which paths you read down.
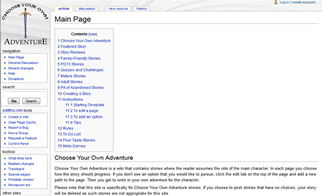
A few sites have tried to mimic this gimmick. The aptly named "Choose Your Own Adventure" (left) contains a variety of user-edited stories in wiki form, while Improbable Island (right) mixes the idea with roleplaying elements.

But you don't need a massive wiki or complex roleplaying engine to make your own story web. In fact, you don't even need to have a story - the techniques in this tutorial can be applied to any web content, and the steps are few, simple, and easy to learn.
Step 1: Download JQuery
Since what we're doing boils down to a series of hide and show calls, you don't need anything more than the basic vanilla-flavored JQuery. Get the latest version here and save it to whatever directory you keep your website in, if you haven't already.

Step 2: Create your page
Next, we'll need something to plug JQuery into, so create a new HTML 5 document in Dreamweaver (or whatever other program you prefer). The code should look like this:
<!DOCTYPE HTML>
<html>
<head>
<meta charset="utf-8">
<title>Untitled Document</title>
<script type="text/javascript" src="jquery-1.6.4.js"></script>
<script type="text/javascript">
</script>
</head>
<body>
</body>
</html>
Note: "jquery-1.6.4.js" is the the default name for version 1.6.4 of JQuery. If you've downloaded a different version or renamed it something else, adjust this line of code accordingly.
Step 3: Set up your content
Before you can play with hiding and showing your content, you're going to need that content to exist. Take this moment to set up your information and divide it into sections or div tags depending on how you want it to unfold.
For example, if you're creating your own "Choose Your Own Adventure" story, you'd most likely want to group your content in terms of story branches - paragraphs beginning with where the branch that lead to this point stopped and ending with the next intersection of choices to be made.
Be sure to give each section or div tag a unique ID. This will be important when we get to the showing/hiding code.
Also keep in mind that you don't have to plan out the full map of your content at the moment. Breaking it into pieces like this makes it easy to put in placeholders where they're needed and come back to tweak them later. Sections can be rearranged, text can be edited, IDs can be renamed, etc.
Step 4: Add your buttons
Once you know where your content is going and what needs to link to what, it's time to start linking it. There are two steps to this process. The first is creating your buttons.
These buttons don't have to be literal buttons, by the way - graphics, text, and any other visible element will work just as well. So long as you can give it an ID, it will suffice as a button.
Whatever you decide on for buttons, put them where you want them (for this example, they work best at the end of paragraph sections), and give them IDs that, ideally, make sense in context to the section they're in and to the section they link to. Or at least give them names that make them easy to differentiate.

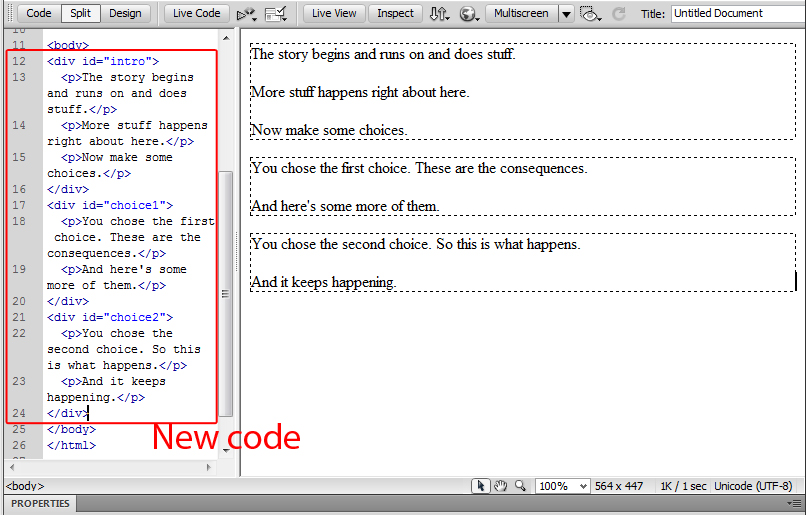
As you can see in this example, the buttons are named "1st" and "2nd". The div tags we will be linking them to are named "choice1" and "choice2", respectively. Coding these buttons to behave properly is the next step.
Step 5: Code your buttons
There's no getting around writing your own Javascript code here, but fortunately for those who shy away from working in the code, it's nothing too intensive:
$(document).ready(function(){
$("#1st").click(function(){
$("#choice1").show();
$("button#1st").hide();
$("button#2nd").hide();
});
});
The line "$(document).ready(function(){" is important to start out with, as it instructs the document to load any code following as soon as it opens. This insures your code works from the start. Just remember to include an extra "});" before the closing script tag to seal up the code properly and keep Dreamweaver from yelling at you.
The bulk of the code, that chunk in the middle, is what does the actual work. Broken down, it means that, when the element with the ID "1st" is clicked on, the element with the ID "choice1" is shown, while the buttons with the IDs "1st" and "2nd" are hidden. As you can see, this takes away the button that was just clicked on, making the choice one-way and cleaning up the content layout behind it.
Simply copy this chunk of code for each button and rename the ID calls as appropriate for the button being clicked, the section being revealed, and the buttons being hidden.

Here we have two buttons to deal with, so we need two copies of this code chunk. Notice the differences - one is a function for the button with the ID "1st", the other with the ID "2nd". The former shows the div section with the ID "choice1", while the latter shows "choice2". Both buttons hide themselves and the other button, which prevents the user from easily revoking the choice they've just made - flipping back to a previous page, if you will.
Step 6: Repeat steps 3-5 as necessary
These steps are simple, but can be chained together to create complex content - sections nested within sections, sections containing a dozen or more choices, choices that branch out even further or lead to the same place, etc.
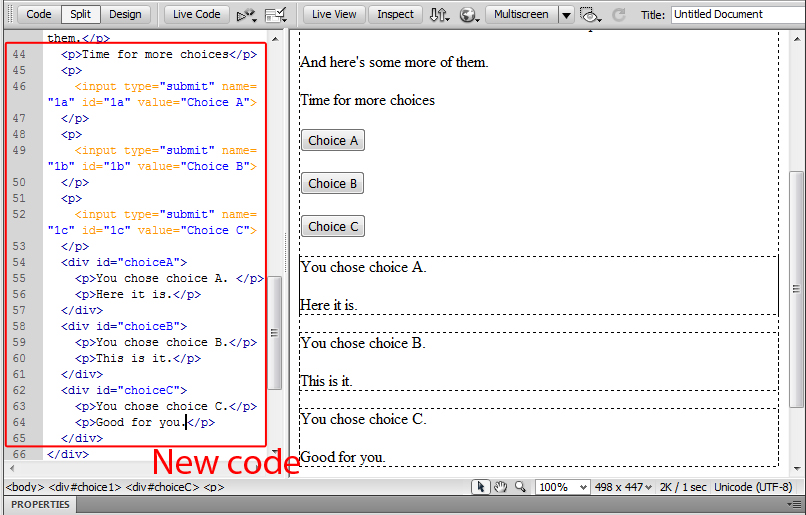
Here we've added three new buttons to the example under the second choice div section, along with subsections to correspond to them.
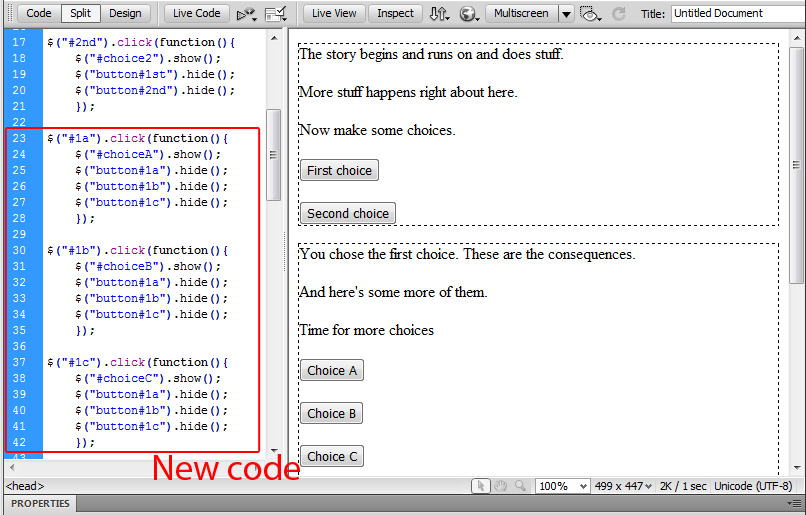
And here we've linked those new buttons and sections in the Javascript - button "1a" links to section "choiceA", "1b" links to "choiceB", and so on. Each button also hides all three buttons in this group of choices. Notice how the code structure is identical between every button we've made so far - the most complicated coding you have to do anymore is making sure the names match.
Step 7: Hide everything but the beginning
Once you've got your content fleshed out as you like and the buttons flowing to the right sections, all that's left to do is hiding everything that you don't want to be immediately viewable after the page first loads. This step is best saved for last when working in programs such as Adobe Dreamweaver so that you can see your expanding content as you work on it - otherwise you'll end up hiding your content from yourself. If you're working strictly in code, however, or in a program such as Notepad, the order of this step is irrelevant.
Hiding a section of content requires only one very small, very simple snippet of CSS code:
<style>
#section_id {display:none;}
</style>
It does exactly what it looks like it does: keeps the section of content it is assigned to from being displayed. Simply copy it to the head of your document (below all of your button code, for easy locating), repeat the middle bit as many times as you have sections that need hiding, and replace "section_id" with the actual ID names of your sections.

Notice how everything in the design view window disappeared except for the content in the div section with the ID "intro". That content is all still there, of course, but doesn't appear by default on the document on load. The only way to display it is to find the button that toggles it on. Your user now has to start at the beginning of your content map and choose their own path through what you've created.
Step 8: Add a refresh button (optional)
Since you're taking away the user's buttons after they choose one, you're committing them to the choices they make. The only way to go back after going forward is to reload the page and start at the beginning.
You may not want the user to do this, in which case you wouldn't want to make it obvious. But if you want to give the user the option of starting over (like at the end of one of the paths through your content, for example, when there are no more choices to be made), one of the simplest and most obvious ways to do so is with a refresh button.
The code, again, is simple:
onClick="window.location.reload()"
Simply copy this string of HTML code and paste it into the opening tag of the button you want to refresh the page.
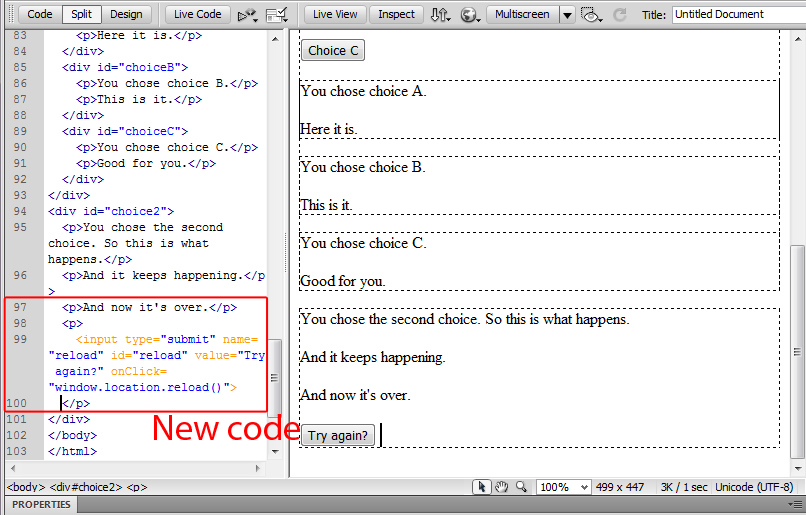
Here we've placed a button at the end of the div section "choice2" with the option of starting over. Clicking the button will, predictably, refresh the page and allow the user to start over. It's little more than a second refresh button on the browser, but it adds a nice touch to your content and lets it loop easily back to the beginning.
Tips to Remember
- Everything boils down to organization, putting what you want to happen when you want it to happen - the beginning stuff on top and progressive stuff cascading down, unless you want something to appear above something else.
- Check and double check your ID names. This is the most confusing part and where your layout is most likely to break. IDs are what tie the whole thing together.
- You can hide your content at any point in the process, but it's usually best to wait 'til you're done laying everything out and editing. Keep a list of CSS hide codes in a word processor or at the bottom of your document if you like to cut and paste into the style tags.
- Remember, you can show and hide anything, any element that can be named. It's not restricted to text in div tags. Experiment.
Conclusion
Finished example page | More complex example page
So now, with some simple code nesting, you should be able to create vast webs of content that connect in complex paths exactly as you tell them to. This makes for dynamic storytelling, though the possibilities are not limited solely to putting fiction online. The content itself, and how it is styled, is entirely up to you. This is simply another way to present it. And when you present the user with an expanded range of choice over what they're seeing, the experience of moving through your content can become almost as entertaining as what you create to fill it in.